When our production team first started receiving requests for brand-specific colors, we quickly realized that most buyers struggle with the same challenge spectrophotometer measurements 1. They want their pressotherapy machines to reflect their brand identity. But they don’t know how to communicate color requirements clearly to overseas suppliers.
To discuss color customization with suppliers, provide your exact Pantone code, request physical color samples before production, clarify MOQ requirements for custom colors, and establish Delta E tolerance limits in your contract. This ensures accurate brand color matching across your pressotherapy machine housings, suits, and packaging.
The sections below cover everything you need to know quality limits (AQL) 2. We will walk through Pantone matching, MOQ thresholds, durability testing, and sample approval processes step by step.
How can I ensure the custom color accurately matches my brand's Pantone requirements?
Color mismatches cause expensive production delays. Our engineers have seen orders rejected because the final product looked "close enough" on screen but completely wrong in person.
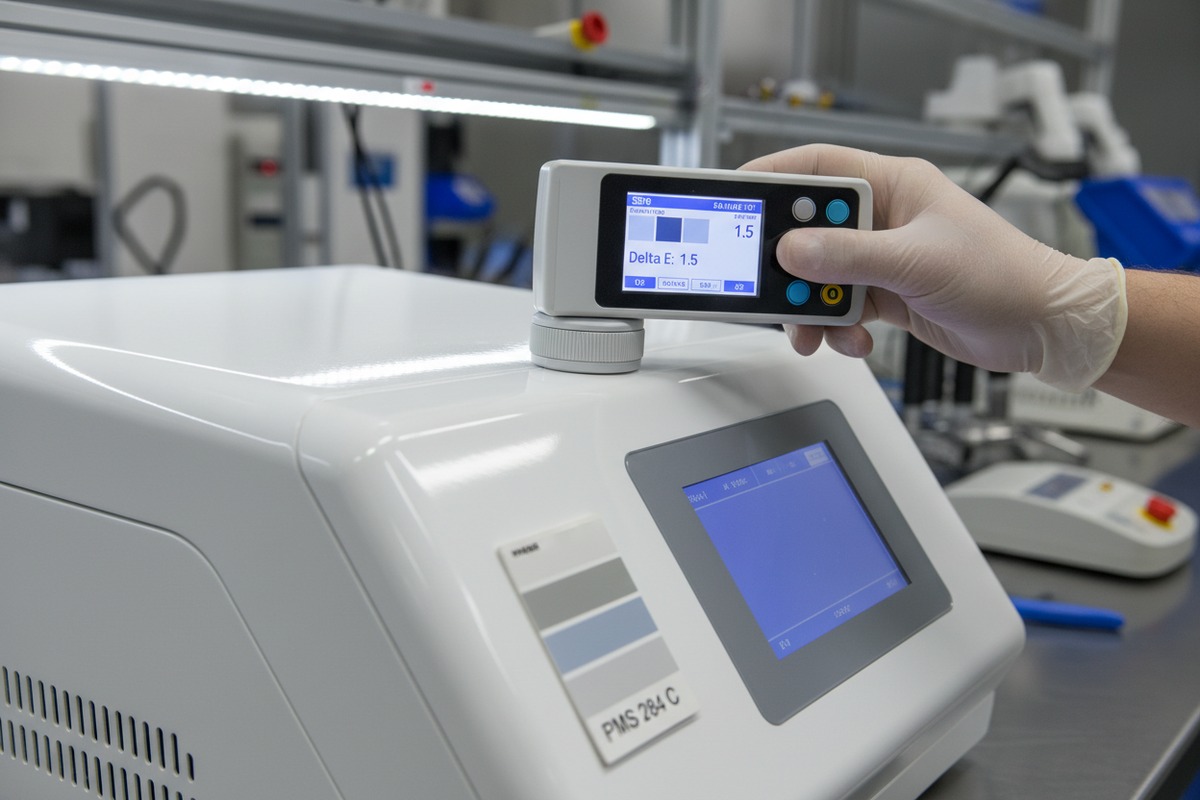
To ensure accurate Pantone matching, provide your supplier with the exact PMS code (e.g., PMS 287C), request spectrophotometer measurements with Delta E tolerance below 2.0, and always approve a physical sample on the actual production material before mass production begins.
Why Pantone Codes Matter
Pantone is the universal language of color in manufacturing. When you tell a supplier "dark blue," that could mean hundreds of different shades. But PMS 287C means exactly one color, everywhere in the world.
Each Pantone number 3 includes a letter suffix. "C" means coated (glossy finish). "U" means uncoated (matte finish). This matters because the same color looks different on different surfaces.
Understanding Delta E Tolerance
Delta E measures the difference between two colors. It tells you how far the produced color is from your target.
| Delta E Value | What It Means | Acceptable For |
|---|---|---|
| ≤1.0 | Not perceptible to most people | Premium products, licensed colors |
| 1.0–2.0 | Minor difference, visible to trained eyes | High-end beauty equipment |
| 2.0–3.5 | Noticeable difference | Standard commercial products |
| 3.5–5.0 | Very clear difference | Budget products only |
| >5.0 | Colors look fundamentally different | Never acceptable |
For pressotherapy machines going into professional salons, aim for Delta E ≤2.0. This ensures your brand color looks correct under salon lighting.
The Material Challenge
Here is something many buyers miss. A Pantone color looks different on plastic versus fabric versus metal. The same PMS 287C will appear slightly different on your machine housing (ABS plastic) versus your compression suits (PU fabric).
This is why you need separate color approvals for each component. Ask your supplier to provide samples on the actual materials they will use in production.
Steps to Get Accurate Color
- Send your supplier the exact PMS code, not just a digital image
- Specify whether you need coated (C) or uncoated (U) finish
- Request spectrophotometer readings, not just visual approval
- Set a maximum Delta E value in your purchase order
- Get physical samples on production materials before approving
What are the typical MOQ requirements when I request a custom color for my pressotherapy machines?
Custom colors cost more than standard options. When we quote custom color work, buyers often get surprised by the minimum quantities required. This is not supplier greed. It is production economics.
Custom color MOQs for pressotherapy machines typically range from 10 to 50 sets for basic color changes on existing materials. Full custom Pantone matching on machine housings may require 50–100+ units. Suit fabric color customization usually starts at 10 sets, while custom packaging often needs 500–1,000 pieces minimum.

Why Custom Colors Require Higher MOQs
Producing a custom color requires setup costs. The factory must mix new paint or dye batches. They need to calibrate spray equipment or dyeing machines. These fixed costs only make economic sense when spread across enough units.
For plastic injection molded parts 4 (like machine housings), the factory orders custom-colored plastic pellets. These pellets have their own MOQ from the raw material supplier.
For suits and fabric accessories, dye houses mix specific color batches. Small batches cost dramatically more per unit.
MOQ Breakdown by Component
| Component | Standard Colors | Custom Pantone | Notes |
|---|---|---|---|
| Machine Housing | 1 unit | 50–100 units | Requires custom plastic masterbatch |
| Compression Suit | 1 unit | 10–20 units | Custom dye batch needed |
| Air Chamber Bags | 5 units | 20–50 units | Material color mixing required |
| Control Panel Face | 1 unit | 30–50 units | Screen printing setup |
| Packaging Box | 50 pcs | 500–1,000 pcs | Printing plate costs |
| Logo/Branding | 10 units | 10 units | Usually lower MOQ |
Strategies to Meet Lower MOQs
Some suppliers offer flexibility. Here are options we have seen work:
Pay a setup fee. Some factories accept smaller orders if you cover their color setup costs upfront. This might add $200–$500 to your order.
Choose from existing custom colors. Ask if another customer already ordered a similar shade. You might be able to share a color batch.
Customize only high-visibility parts. Put your custom color on the front panel only. Use standard colors for less visible components.
Combine orders over time. Some suppliers let you order the custom color components now and store them for future assembly.
Price Impact of Custom Colors
Expect custom colors to add 10–20% to your unit cost on smaller orders. This premium decreases as quantity increases. At 500+ units, custom color might add only 3–5% to your cost.
Always get written quotes for both standard and custom color options. Compare the total investment, not just the per-unit price.
How do I verify the durability of the custom finish during my pre-shipment inspection?
A beautiful color means nothing if it peels or fades within months. Our quality control team has developed specific tests that catch finish problems before shipping.
During pre-shipment inspection, verify custom finish durability through adhesion tape tests, scratch resistance checks, cleaning solution exposure tests, and visual inspection for color consistency across the production batch. Document acceptable quality limits (AQL) for finish defects in your inspection checklist and compare all samples against your approved golden sample.

What Pre-Shipment Inspection Covers
Pre-shipment inspection 5 (PSI) happens when 80% or more of your order is produced and packed. A trained inspector visits the factory to check your goods before they ship.
The inspection uses statistical sampling based on AQL standards. This means the inspector randomly selects a certain number of units based on your total order size and acceptable defect rates.
Durability Tests for Custom Finishes
Here are the tests that matter most for pressotherapy machine finishes:
Cross-Hatch Adhesion Test. The inspector makes a grid of small cuts in the painted surface, then applies and removes tape. Cross-Hatch Adhesion Test 6 If paint lifts off, the adhesion is poor.
Scratch Resistance. Using a standardized hardness pencil, the inspector checks if the finish scratches under normal pressure. Good finishes resist scratches from 2H–4H pencils.
Chemical Resistance. Apply common cleaning solutions (alcohol, mild disinfectant) to the surface. Check for color change, softening, or damage after 30 minutes.
Abrasion Test. Rub the surface with a standard cloth for a set number of cycles. Check for color transfer or wear.
UV Exposure Review. If the manufacturer offers accelerated aging test results, review these. They show how the color will hold up over time.
Inspection Checklist Items
| Check Point | Pass Criteria | Common Issues |
|---|---|---|
| Color Match | Within Delta E 2.0 of golden sample 7 | Batch variation, wrong shade |
| Surface Finish | Consistent gloss level, no orange peel | Spray inconsistency, dust inclusion |
| Adhesion | No paint lift in tape test | Poor surface prep, incompatible primer |
| Scratch Resistance | No marks at 2H pencil hardness | Too-thin coating, wrong paint formula |
| Edge Coverage | Full color at all edges and corners | Overspray issues, manual touch-up needed |
| Color Consistency | Same shade across all units | Batch-to-batch variation |
Using Golden Samples
A golden sample is your approved reference. Keep one copy. Send one to the factory. Give one to your inspector.
During PSI, the inspector compares production units against this golden sample. Any deviation gets documented with photos. You then decide whether to accept, reject, or request rework.
When to Reject a Batch
Set clear criteria before inspection. Common rejection triggers include:
- Delta E exceeds your specified tolerance
- Adhesion test failure on more than 2% of sampled units
- Visible scratches or finish defects above your AQL
- Color variation between units exceeds acceptable range
Can I request a physical color sample to approve before my full production run starts?
Approving production based only on digital images is risky. We always recommend physical sample approval. It protects both buyer and manufacturer.
Yes, you should always request and approve physical color samples before production. Ask for pre-production (PP) samples made with actual production materials and processes. Keep signed, dated, and sealed golden samples for yourself, the factory, and your third-party inspector. Most suppliers charge $50–$200 for custom color samples, which is refundable against larger orders.

The Sample Approval Process
Here is how the process typically works:
-
Submit your color specification. Provide Pantone code 8s, existing product samples, or other clear references.
-
Supplier creates trial samples. They produce 1–3 samples using production-equivalent materials.
-
You evaluate under proper lighting. Use a light booth or consistent daylight. Never judge color under fluorescent office lights alone.
-
Provide written feedback. If rejected, give specific direction like "too yellow, add blue" rather than vague comments like "looks wrong."
-
Iterate until approved. Most colors require 2–3 rounds of samples.
-
Sign and seal the golden sample. Date it. Add your initials. This becomes your legal reference.
What Makes a Good Sample
Not all samples are equal. A good pre-production sample should:
- Use the exact material planned for production
- Be made using production processes, not prototype methods
- Include all surface treatments (primer, paint, clear coat)
- Come in multiple pieces to check consistency
- Include spectrophotometer readings
Sample Costs and Timing
| Sample Type | Typical Cost | Lead Time | Notes |
|---|---|---|---|
| Color chip on material | $20–$50 | 3–5 days | Basic color verification |
| Painted component sample | $50–$150 | 7–14 days | Shows actual finish quality |
| Full unit in custom color | $100–$300 | 14–21 days | Complete visual reference |
| Suit fabric swatch | $30–$80 | 5–10 days | Dyed to your specification |
Many suppliers credit sample costs against your production order. Always negotiate this upfront.
Evaluating Samples Correctly
Lighting matters enormously. The same color looks different under:
- Daylight (D65)
- Office fluorescent (CWF)
- Incandescent bulbs
- LED lighting
Professional evaluation uses a light booth with controlled D65 lighting. If you do not have one, evaluate samples near a north-facing window during daylight hours.
Place samples against a neutral gray background. White or colored backgrounds affect your perception.
Documentation Requirements
When approving a sample, create a complete record:
- High-resolution photos under controlled lighting
- Spectrophotometer readings (L*, a*, b* values)
- Material specification (substrate, coating type)
- Signed approval form with date
- Seal or sticker confirming approval status
This documentation protects you if production deviates from the approved sample.
Conclusion
Getting your pressotherapy machine color right requires clear Pantone specifications, realistic MOQ planning, thorough durability testing, and proper sample approval. Work with your supplier early in the process. Document everything. And never skip the physical sample approval step.
Footnotes
1. Details the instruments used for accurate color measurement. ↩︎
2. Defines acceptable quality limits for product inspections. ↩︎
3. Official website of the color matching system. ↩︎
4. Provides an overview of the injection molding manufacturing process. ↩︎
5. Explains the process of inspecting goods before shipment. ↩︎
6. Standard test method for evaluating coating adhesion. ↩︎
7. Describes the benchmark product for quality control in manufacturing. ↩︎
8. Official source for the universal color matching system. ↩︎

 English
  Español de México
  Deutsch
  Français
  العربية
  Русский